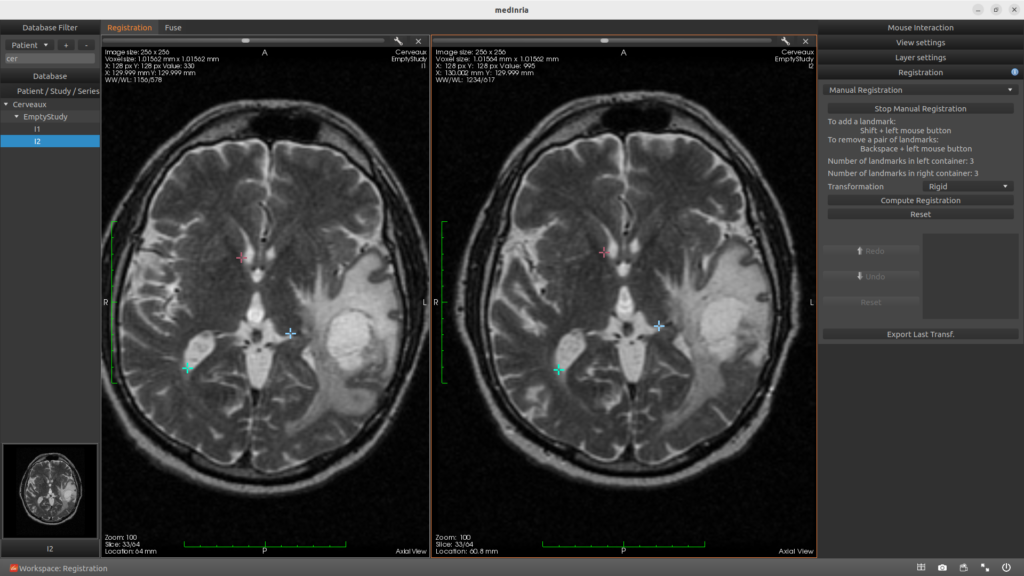
Overview of data registration
The Registration workspace aims to apply registration methods on images.
When an image is acquired, it is placed in a given coordinate system where each voxel is aligned on a grid. Any other acquired image will be placed in a similar grid, but the subjects may not be placed at the same position, or with the same orientation in this coordinate system. Different transformation can happen during acquisition between images.
All registration algorithms aim to realign a moving image on a reference or fixed image, and output a newly interpolated image, realigned on the same grid as the fixed image.
The Registration workspace
The Registration workspace is composed of:
- A left column: the database.
- In the middle, 2 containers: the “Registration” tab and the “Fuse” tab. They allow the user to set the inputs and watch the results of a registration process.
- A right column with:
- the Mouse interaction tool, and the Views and Layers settings tools (more information in the Visualization documentation).
- A list of algorithms toolboxes to apply registration on the data. The registration algorithms being very different to one an other (affine, non rigid deformation field…), the toolboxes can host different parameters.
- An undo/redo tool.
Only image to image (3d volume) registration is available.

Registration tab
This tab is the first the user sees in the Registration workspace. It is composed of two view containers. One is labelled “FIXED”, the other “MOVING”. The user can drag from the left column database the two needed volumes and drop them into the corresponding containers.
To check the alignment of these volumes, before as well as after processing the moving image, the user can link the two views by clicking on the chain-link icon in the “Layer settings” toolbox (more information in the Visualization documentation). To ease the comparison, the views can display the axis by clicking on the axis check box in the “View properties” toolbox.
The result of the registration process will replace the moving image after computation. This way a first rigid registration process can be followed by a second non rigid step for instance.
Fuse tab
To compare the volumes before and after registration, the Fuse tab automatically shows the two inputs overlayed within the same view. The user can set the opacity of each layer with its slider in the “Layer settings”. The user can also apply different Lut (Look up tables) to each volume to display distinct color pallets.
Two data with distinct Luts and opacities:

Two data after a registration with Optimus algorithm:

Undo/Redo tool
Under the registration toolboxes, you can find a widget allowing to redo or undo an already done registration process. The user can also reset the views to the original data, and export the current transformations.
Running an algorithm
- Choose your toolbox in the right panel within the * Choose a toolbox * combobox.
- The “?” button in the right of the toolbox header can give you information about the toolbox.
- Use the left “FIXED” area to drop your first data, and the right “MOVING” view for the second input.
- Both inputs are overlaid in the new “Fuse” container.
- Choose your parameters if needed.
- Follow the instructions in the toolbox.
- The result is displayed in the right “MOVING” area, and updated in the “Fuse” tab.
Toolboxes
- Diffeomorphic Demons: to apply diffeomorphic demons algorithm on images.
- LCC Log Demons: to apply LCC log demons algorithm on images.
- Manual Registration: to manually define landmarks on two volumes you want to register.
- Optimus: to register with the New UOA optimizer method. The transformation computed is a rigid transformation.


